Confirming the default network settings
- Open up the Control Panel (in My Computer)
- Click on the Network icon
- If you have Client for Netware Networks:
- Highlight it
- Click on Remove
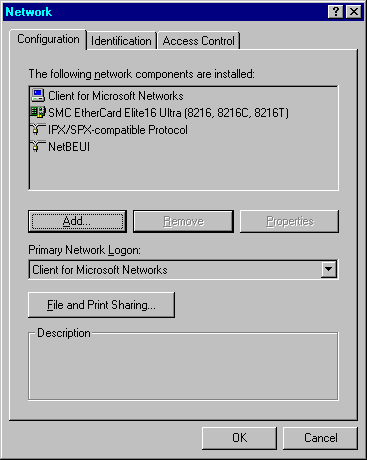
- The default setting should look like this panel:
Adding TCP/IP Protocol
- Click on the Add button
- Click on Protocol
- Click on Microsoft
- Click on TCP/IP
- Highlight NetBEUI - Click on Remove
- Highlight IPX/SPX - Click on Remove
- Click on OK and reboot if necessary
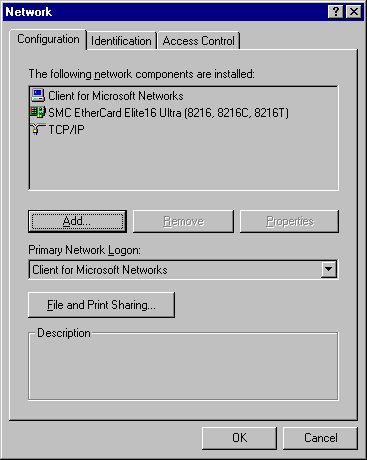
- Your Network Setup should look like:
Configuring TCP/IP IP Address
- Double Click on TCP/IP
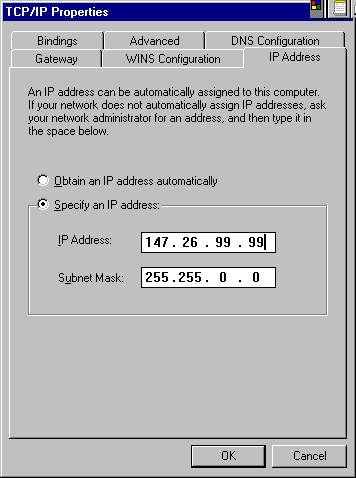
- Select IP Address TAB:
- Specify an IP address
- Click on TCP/IP
- Enter your IP address and Subnet Mask. These should be obtained from your System Manager for your LAN. If you are not sure who your LAN System Manager is, send email to [email protected] to find out! Failure to do so, can cause problems for everyone on campus.
- Click on WINS Configuration TAB
Configuring TCP/IP WINS Configuration
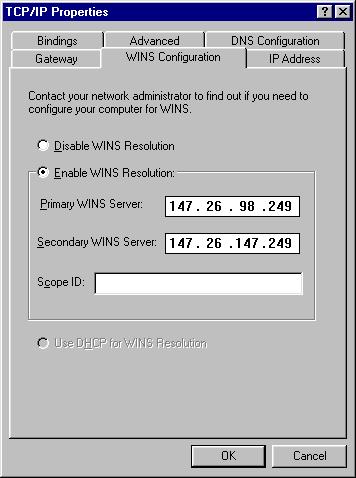
- We do have WINS Servers, so select Enable WINS Resolution and add 147.26.98.249(MCS) and 147.26.147.249(JCK). When you are finished it should look like the picture below
- Click on Gateway Configuration TAB
Configuring TCP/IP Gateway Configuration
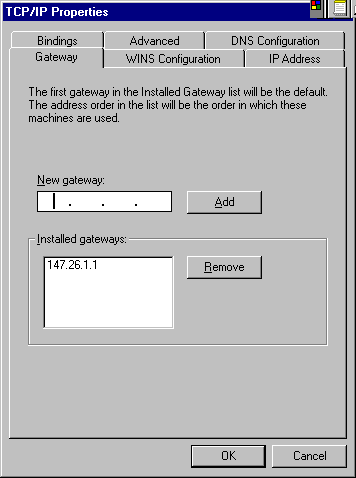
- Type in the IP address of your Gateway (147.26.1.1) or Routers
- Click on ADD after each one. (There might be just one.) Your configuration should like the one below
- Click on DNS Configuration TAB
Adding TCP/IP Protocol
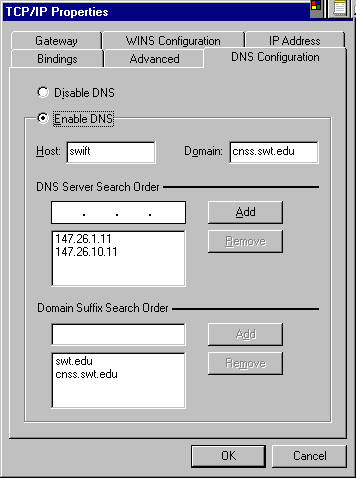
- Type in your Host Name of YOUR computer (IP Name). DO NOT use LEELA or NYSSA here! These should be obtained from your System Manager for your LAN. If you are not sure who your LAN System Manager is, send email to [email protected] to find out! Failure to do so, can cause problems for everyone on campus.
- Type in your Domain Name, like yoursubdomain.swt.edu, this should be obtained from your System Manager for your LAN
- Type in the IP address for your network's Domain Name Server(s). We use 147.26.10.11
- Click on Add
- If you have more than one DNS server, add subsequent IP addresses. (Such as 147.26.1.11) When you are done it should look something like the picture below.
- Click on OK, then OK again and reboot. You should then have network access.
Testing the TCP/IP Protocol - Getting Latest Netscape
- Go to the task bar and click on Start, then Run
- Type in FTP FTP.CNSS.SWT.EDU and return
- Type in anonymous and hit return, then Guest for the username and hit return
- Now type CD W95STUFF and hit return
- Now type LCD \ and hit return
- Now type binary and hit return
- Now type GET ns.exe and return
- After the download is finished type quit and hit return
- Now go back to Start, Run and specify C:\ns to install Netscape. After it is installed you may delete the file C:\ns.exe
